Articles by "how-to"
Showing posts with label how-to. Show all posts
Know your Chat Buddy on WhatsApp. This amazing WhatsApp trick will help you find out your favorite person or the person you love to chat with on WhatsApp.

Hello and Welcome to "Postdynamic - The Master's World". In this article of "Tips & Tricks", we will share an amazing WhatsApp Trick that will let you know your Chat Buddy on WhatsApp.

#LetsGoInDetail
WhatsApp Trick - Know Your Chat Buddy on WhatsApp

Amazing WhatsApp Trick 2020

There is no doubt that WhatsApp is the best and most popular instant messaging app worldwide. With over 5 billion downloads, it is the widely used instant messaging app. Along with messaging, the app even offers video and voice calling features.
So, In this article, we bring to you an amazing trick which many of you won't be aware about. The trick is related to popular messaging app i.e. WhatsApp.

This trick will reveal who your closest friend is. Not only that, but the method will also show you the total numbers of audio messages, documents, stickers, photos, videos, etc. that had been exchanged.

How to Know Your Chat Buddy on WhatsApp


So, let's find out who is your favorite person on WhatsApp. The person with whom you chat and share media a lot on WhatsApp for Android.

  1. First of all, open WhatsApp on your Android smartphone.
  2. In WhatsApp, tap on the Three Dots in upper-right corner and go to 'Settings'.
  3. In 'Settings', choose the 'Data and Storage Usage' option.
  4. After that, tap on the 'Storage Usage' option.
  5. And it will show the list of groups and WhatsApp users you are talking to the most.
  6. Tap on the particular group or user to find the number of texts, media files etc.
By tapping on particular group or user, you can know with whom you chat the most, share media like photos, videos, audio messages etc. a lot.

You can also join our Telegram and WhatsApp group for more updates : -

So, this is how you can Know Your Chat Buddy on WhatsApp with whom you communicate the most. However, this trick will not be useful if you frequently clear your WhatsApp Chats and Media.


I hope this article will be useful. #Stayhome #Staysafe
Don't forget to share with your friends on social networks.

So keep visiting “Postdynamic – The Master’s World“. If you have any quires or questions, do comment below and give your feedback also. Thanks for visiting “Postdynamic – The Master’s World“.

deal-of-the-day
Facebook added a new Lock Profile feature for Indian users especially for women to protect their Facebook account data i.e. pics, status. In other words, you can now make your Facebook Account Private.

Hello and Welcome to "Postdynamic - The Master's World". Today's article of "Social Media" under "How to" guide is about the new Facebook feature - Lock Profile which is now available in India.

#LetsGoInDetail
lock-profile-feature-make-your-facebook-account-private
lock-profile-feature-make-your-Facebook-account-private

Make Your Facebook Account Private

As we all know, Facebook is one of the popular social media apps with over 5 billion downloads. It has always been about connecting people with their loved ones. Along with that there are also concerns regarding data stealing like profile pictures especially of girls/women and misusing for own benefits. And to overcome these issues, Facebook is working on it by providing new features like profile protection. Apart from that Facebook has now availed new feature to its Indian users i.e. Lock Profile. The feature is rolling out in phases in India and can be enabled from mobile app.

We are deeply aware of the concerns people in India, particularly women, have about protecting their online profile. Today, we are announcing a new feature which, in one easy step, will give people a lot more control, ensure their privacy and keep them safe and secure online.
– Ankhi Das, Public Policy Director, Facebook India

Lock Profile - How it Works

So what this new feature is and how to enable it?
 This new Lock Profile feature is probably like the Private Account feature of Instagram. (If you enable the private account feature in Instagram, your account information and pictures are accessible only by those who follow you.) So by applying this Lock Profile feature, you will be able to make your account private i.e. only your friends will be able to see your pictures and posts. Therefore, this a quite good feature to protect your Facebook account information.

How to Enable - Lock Profile Feature

  • Open Facebook App
  • Go to your Profile
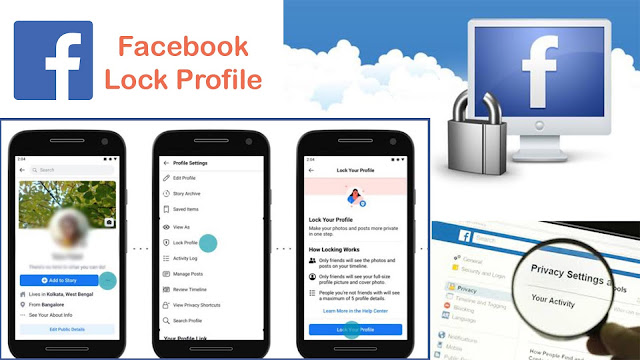
  • Click on three dots on the right of "Add to Story" button below your Profile Picture.
  • It will take you to profile settings
  • And there you will see new "Lock Profile" option.
Lock Profile Feature - Make your Facebook Account Private
For more clarity, you can see the above picture.

So this all about Facebook's new Lock Profile feature.

I hope this article will be useful. #Stayhome #Staysafe
Don't forget to share with your friends on social networks.

So keep visiting “Postdynamic – The Master’s World“. If you have any quires or questions, do comment below and give your feedback also. Thanks for visiting “Postdynamic – The Master’s World“.


To get latest updates via messages join our WhatsApp and Telegram Groups :- 

Latest trick Canada USA Unlimited free Calls Texts


In today's world we all know about internet calling but still there is a bit problem in it. Like sometime the person you are trying to contact comes offline and you have to wait for him to be online.
If this is about within the country then you can easily make normal phone calls at decent cost but if this is about International call then you need to pay a lot of money for the normal phone calls. But do not worry we have a trick just read the article completely.
Welcome to "Postdynamic - The Master's World". Our Today's topic is in "Tips & Tricks" and "How To" guides. And We gonna share you an awesome Latest trick Canada USA Unlimited free Calls Texts trick. So by not wasting time.

#LetsGoInDetail

First of all Let me tell you about this unique trick. We are going to do Latest trick Canada USA Unlimited free Calls Texts using an app which I will provide you with the link in this article.
But this is not like other apps, it is something different.

App features


  • Canada USA Unlimited free Calls Texts

  • You can make Calls and SMS directly to phone numbers

  • The person you are calling, do not need to be online to receive your calls


Note *But to make calls you must have an internet connection(but your friend or family member do not require internet connection).


Procedure


Download and Install (Canada USA Unlimited free Calls Texts) App


  1. Download app from here:- Link

  2. After successfully downloading, install the app and open.

Create Account


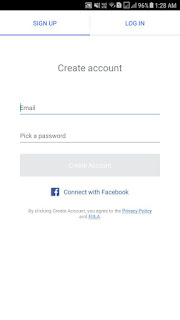
  1. As you will open the app you will see this screen.
    Latest trick Canada USA Unlimited free Calls Texts
  2. Select Sign up and Enter your email address and pick a password.

  3. Then Tap on create account.

  4. Now you will receive a confirmation email on your given email address.

  5. After conforming your email come back to the app.

  6. Now Sign In with email and password, or you can also Sign In with Facebook.

  7. Now it will ask you to enter area code.

  8. Enter any area code from these like :- 202, 501, 786, 949 and continue next.

  9. Select any phone number from the list.

  10. Now you are ready to make calls and sms.
Latest trick Canada USA Unlimited free Calls Texts

This is all about the Latest trick Canada USA Unlimited free Calls Texts.

We hope you like it and find it useful. Do not forget to share this with your friends and family and on social websites.

YouTube Video:- Watch Here

We will provide you more and better tricks. You will also find some great and informative articles here. So keep visiting “Postdynamic – The Master’s World“.

If you have any quires or questions, do comment below and give your feedback also.

Thanks for visiting “Postdynamic – The Master’s World“.

Facebook:- https://www.facebook.com/postdynamicYouTube:- https://www.youtube.com/postdynamicTwitter:- https://twitter.com/postdynamicInstagram:- https://www.instagram.com/postdynamic_official/

As per new rule of Indian Government now it is compulsory to "Link Aadhaar Card with PAN Card" for filling taxes. Because according to the Income Tax Department's report there are many fake PAN Card holders. Due to which Government was unable to reveal their original income. Therefore, This rule of linking Aadhaar card and PAN card is now in-front of us. Because Aadhaar is an unique id of every individual therefore now it will become impossible to use fake PAN Cards. Or we can say that now single person will have single PAN card for sure means no duplicate PAN cards.
So if you don't know about this news and have not linked it yet then this article is for you. Link Aadhaar and PAN as soon as possible to continue your service of filling your taxes and returns.
Welcome to "Postdynamic - The Master's World". In this article we are going to discuss that how to Link Aadhaar Card with PAN Card online. So here is the full step by step guide for you.

#LetsGoInDetail

We are going to link Aadhaar and PAN via Income Tax e-filling Website. Before moving further take care of this Important Note:

  • For Linking Aadhaar and PAN, your details on both Cards need to match

  • In Case, if your Gender and Date of Birth is matching but Name is not matching. Then you have to provide Aadhar OTP to proceed.
So now lets move to the steps to Link Aadhaar Card with PAN Card.

Steps To Link Aadhaar Card with PAN Card

  1. First of all open this LINK in new tab. It will take you to the Income Tax e-filling website.

  2. Now you will see a box saying Link Aadhaar. It will ask you for PAN,Aadhaar Number and Name as per Aadhaar.

  3. Fill out the all details carefully.

  4. Now there will be a option of Captcha Code. Also fill this out carefully as it will be shown in a box.

  5. And the final Step is Link Aadhaar. Click on Link Aadhaar button and that is it.


So these are the steps to link Aadhaar and PAN. Details on both cards should be same to link these cards. In case of mismatch, the website will send OTP to your mobile number which is in link with your Aadhaar Card. After filling that OTP you can proceed with the linking of your Aadhaar and PAN.


Government is also trying few more easy ways like by letting you upload scan of PAN card to link it with Aadhaar. These options are not active yet but we are expecting that these options will also be available soon.

So, That is all with this article hope this will help you to Link Aadhaar Card with PAN Card. If you face any problem you can ask us in comments for the solution.
Do not forget to share our articles with your friends and on social platforms. Thanks for visiting Postdynamic - The Master's World. Keep visiting and keep learning. Thanks :-)

In this article I am going to tell you that How to "Become WhatsApp beta User officially". First of all let me tell you becoming a WhatsApp beta user means that you are becoming a WhatsApp developer. And you will access all new features in your WhatsApp before they go public. Becoming a WhatsApp  beta user also means that you are becoming a WhatsApp tester. And it allows you to send your feedback about new features directly to the developer.

Welcome to "Postdynamic - The Master's World". Lets start the topic and have a full step by step tutorial of becoming a WhatsApp beta User.

So #LetsGoInDetail

Become WhatsApp beta User Officially

First of all you need internet connectivity so that you can access Google Play Store. From where you will become WhatApp beta User. So connect your internet it may be with WiFi or with your mobile data plan. After that open Google Play Store with Gmail id logged in. Now simply type WhatsApp in the search bar. It will show WhatsApp icon open that and it will show the option of Install if you have not installed it.

Now before installing WhatsApp you have to do a little bit of work to become WhatApp beta user. And if you have already installed WhatsApp don't worry you do not have to uninstall this.  So firstly scroll down to the bottom of screen.
Box
There you will see a box in which "Become a beta tester" is written along with description.
Like "Try new features before they're made public. Give your feedback directly to the developer".
And you will see two options there "Find out  more" & "I'M IN". Tap on "Find out more" only if you wanna go on WhatsApp's official website & read some terms and conditions. If not interested in Terms & Conditions Tap on "I'M In".

After taping on "I'M In" a pop up message will appear. Which will ask you about that you really wanna Join beta programme or not. Because some features in beta versions may be unstable. Don't Care about that just tap on "Join".

After that Beta Sign Up Progress will start. And in a few minutes you will become WhatsApp beta user. After becoming beta user you will see option to update your WhatsApp. Tap on that and update it to access new features. In Case you do not have installed WhatsApp before. Then you will see the option of Install(instead of update). Tap on that and install WhatsApp beta version to access new and testing features of WhatsApp.

Another Way


Open this link in chrome and login with your google play store gmail ID
Note:
After joining WhatsApp beta programme you may receive 2-3 or more updates within a week. Because WhatsApp keeps trying new features in short intervals.
And if you wanna leave WhatsApp beta programme then you will have to tap on leave button and uninstall. And after that you can install a normal WhatsApp version.

So that is all with this article i.e. "Become WhatsApp beta User Officially (Step by Step Guide)". Thanks for visiting "Postdynamic - The Master's World". Keep visiting & keep learning.

Don't forget to share our articles with your friends and on social websites. :-)

Hi there, In this article I'm going to explain how to "Setup Authenticator laptop desktop step-by-step guide".

This is very useful and informative article for everyone.
Specially for those, who are very concerned about their privacy and security.

Welcome to "Postdynamic - The Master's World" and let's start the tutorial.

So #LetsGoInDetail

First of all for the people, who don't know anything about Authenticator. They can read our this article about Authenticator here:- Authenticator-Setup, use, features(complete step by step guide).

How to Setup Authenticator laptop desktop step-by-step complete guide

So, these are points I'm showing you as overview of the article.
  1. Software Requirements
  2. How to Setup Authenticator
  3. Benefits of Setup Authenticator either on laptop or desktop
So this is gonna be interesting.

1. Software Requirements

First of all we need a windows Authenticator software. So that we can setup Authenticator either on laptop or desktop.

And the software we are going to use is "WinAuth".
Because this is very easy to use, tiny in size and secure software application of Authenticator purpose.

You can download "WinAuth" by just searching it either on Google or use this link:- Download WinAuth.

Note:- If you are running Windows 7 then you must have Microsoft .NET Framework 3.5 or higher version(Download it here:- Download Microsoft .NET Framework).(Skip this if already installed)

2. How to Setup Authenticator Laptop Desktop

  1. After downloading above two files "WinAuth" and "Microsoft .NET Framework 3.5 or higher".
  2. Now Install both download software files.
  3. After installing, now goto Desktop and double click on "WinAuth" shortcut icon.
  4. Finally "WinAuth" window will open.
  5. Click "Add" button.
  6. And select the Authenticator Service you want to use.
  7. If your Authenticator Service is not listed, then just select Authenticator.
  8. Now first of all enter Name(which defines your service and account name like:- Facebook(your_username), Google(your_email_address) etc).It is just for your understanding.
  9. And now move onto next step, from the website copy "secret key" or "secret code" into next field.
  10. So now Click on "Verify Authenticator" button to check key is valid or not.
  11. And you will see the code generated below in "WinAuth" Window.
  12. Copy and paste this code on the website, from where you copied "secret key" or "secret code" and verify Authenticator.
  13. Finally, now click on "OK" and save the Authenticator.
  14. That's it you have successfully setup the account.
Now, further you can right click on added account in WinAuth for more options and icon customization(not necessary).

People also reading :- Backup Authenticator Apps accounts securely(Google or Any Authenticator App)

3. Benefits of Setup Authenticator either on laptop or desktop

It is always better to have extra security. So by setting up Authenticator either on laptop or desktop, you are having a stronger hold on your security.

For example:- You reset your phone suddenly for unexpected reason. Which means all the saved accounts in Authenticator app are now gone. Or you don't have access to your smartphone.

But you still have already setup Authenticator either on laptop on desktop, which will help you to access your account easily.

In our article how to "Backup Authenticator Apps accounts securely(Google or Any Authenticator App)" we have explained the way to use Authenticator of same account in Multiple devices.

So, this is how you can "Setup Authenticator either on laptop or desktop". And I hope you are now ready for it's use practically.

And this is the end of article "Setup Authenticator laptop desktop step-by-step guide". I hope your all doubts are clear now and if not then comment your feedback and also ask your doubts in comments.

Thanks for visiting "Postdynamic - The Master's World". Keep visiting and keep learning.

Do not forget to share our articles with your friends and on social media websites.

Hi there, in this article I'm going to explain how to "Backup Authenticator Apps accounts securely(Google or Any Authenticator App)".
And this is very interesting and easy step by step tutorial for you.

Welcome to "Postdynamic - The Master's World".
So in this article, the things we gonna catch up are:-
1. Best and Secure Authenticator App.
2. Backup of accounts from Authenticator App.
3. Bonus tip benefit secret key.

So #LetsGoInDetail

Backup Authenticator Apps accounts securely(Google or Any Authenticator App)

First of all if you want to know about Authenticator and Authenticator App check this link:- Authenticator complete step by step guide

So Let's Start.

1. Best and Secure Authenticator App

You may find lots of apps that are claiming to be best or rated best by peoples. But I totally disagree with those peoples and apps.
Because whenever using third-party app we must check whether it is trust worthy or not. Means it's all about our security and privacy.
And never go with the apps which stores your accounts and data on there cloud servers. We do not need to discuss those apps which are not best and secure. Let's discuss the best and secure one.

Google Authenticator is best and secure Authenticator App.

It is Secure because it is by the "Google Inc." that means Google is developer of this app and you can trust Google.
And Reason is quite clear the whole Android operating system of your phone is developed and managed by Google.
If you feel secure with Android operating system you should feel secure with Google's apps.

And it is Best because it has clean UI(User Interface) and easy account setup process. Most important is Google Authenticator do not save your Authenticator accounts and data on its servers. And if in future it starts saving on its servers then also you can feel secure than the other third-party apps.

2. Backup of Accounts from Authenticator App

Well there is no backup option for accounts present in Google Authenticator app. But we need this backup in case of Factory Reset of our smartphone or new software/firmware installation.

Don't worry here is solution for this problem.
While setting-up Authenticator account check this link first how to do Authenticator setup(this setup method is compulsory for backup Authenticator apps accounts securely), and remember bonus tip given below.

3. Bonus tip benefit of secret key

  1. Bonus tip is, copy your Authenticator secret key code.
    -Keep it same as original, don't change any alphabet letter/number to small/capital yourself.
  2. And save that secret key code to secure place either in the form of a document or a text file.
  3. Now whenever you reset or reinstall software of your smartphone. You have to install the Google Authenticator app.
  4. And add your account by secret key code you saved in step "2." under "bonus tip benefit of secret key".
The benefit is that, as you have secret key. So you can setup Authenticator of same account in Multiple devices and the codes on every devices will remain same.

You can also setup Authenticator on Laptop/Desktop read this :- how to setup Authenticator on Laptop/Desktop(you must read this article for extra security)

So this is end of article "Backup Authenticator Apps accounts securely(Google or Any Authenticator App)" and this is best, free and easiest way to backup without any extra backup app.

If you have many accounts already added in your Authenticator app then use Titanium Backup app. But I must say the method I told you is the best method(you can re-add all accounts with my method easily). Finally choice is your.

I hope this is very helpful article for you and you have learnt something new today.

Don't forget to share this article with your friends and on social website.

Thanks for visiting "Postdynamic - The Master's World". Keep visiting and keep learning.
Hello there, first of all this article is all about Authenticator-setup, use, features(complete guide).
And this is going to be a very useful and knowledgeable article for you. So, be ready to read completely.

Welcome to "Postdynamic - The Master's World".

Before start, let's have a overview of Authenticator and about its setup, use and features.

#LetsGoInDetail

First of All,
What is Authenticator ? its use and features?

-Authenticator is advance layer of security for our online accounts(like bank accounts, social accounts and other websites accounts). It is part of you can say either Second-factor Authentication or two-step verification or 2nd-step verification. Means whatever name the websites gives to their second layer of security.
-It is alternative of Text/call OTP system.
-Which helps you to generate OTP codes and approval codes offline, So that if you are in a situation where you can not receive calls and text messages. But you have already setup Authenticator, so you can generate OTP offline without networks.
-And It generates OTP codes randomly after fix interval either timer base or counter base.

Requirements:-
-Website's Official or Third-party Authenticator App-You can download Authenticator App either from google's play store or any respective app store available in your smartphone/device.
-I will suggest you to download Google Authenticator app because it's very secure and easy to use.

So Authenticator is very quick, convenient and useful method for OTP verification.
Because by this method you do not have to wait for text/call to arrive on you phone.

People also reading:- Backup Authenticator Apps accounts securely/

How to do AuthenTicator-Setup

  1. First of all for Authenticator Setup you need to login into the website account, where you want to enable Authenticator.
  2. And then goto the account security options where either your Second-factor Authentication or two-step verification or 2nd-step verification(whatever website names it).
  3. Now look for Authenticator-setup option and follow the procedure they show you on screen.
  4. And there are only two methods for Authenticator Setup, QR-code scan and secret key("Tip:-secret key option is usually appears when you click on "Can't scan/verify QR-code").
  5. Open the Authenticator App in your smartphone and tap on "+ icon button" or add new account from option.
  6. Finally then it will ask you either scan QR-code or enter secret key(which is showing on your website screen).
  7. I will suggest you to go with enter secret key option(Also check this link:- Benefits of setting up Authenticator with secret key).
  8. And when you will copy and enter the secret key in your Authenticator App either on smartphone or on laptop/desktop/any supported device, It will generate a code.
  9. So you need to enter the code on website's verification box showing with/below the secret key.
  10. And after verification you have successfully setup the Authenticator for login OTP/approval codes.
So this is the end of article "Authenticator-setup, use, features(complete guide)".

I hope you are liking our articles and you can also give us your feedback by comments.
Do not forget to share our articles with your friends and on social websites.

Thanks for visiting "Postdynamic - The Master's World". Keep visiting to keep learning.

Hello there, this article help you purchasing new smartphone .

Competition between smartphone makers is increasing day by day.
So as a result marketing is also playing dark with tricks.
Means the item you are purchasing, is it really best according to its price?

Welcome to "Postdynamic - The Master's World" this is going to informative for you to read this article completely.

So #LetsGoInDetail

Let's Start with the topic Purchasing new smartphone carefully check this guide

First of all we need to know the things to focus on.
For which check the below list.
  1. Cost
  2. Features
  3. Technical Specifications
  4. Comparison
  5. Quality and Durability
  6. Service Support
  7. Brand

Cost

Main thing to concentrate before purchasing new smartphone is cost. Because everyone has the their own budget. Once you have decided money to spend on purchasing new smartphone. Now you have to move onto next step features that what features are available at this price.

Features

Check for the features you can get at the budget you have made by searching for available smartphones. You can search on internet and local markets.
While checking features keep in mind that you have to look for maximum and latest features as your budget price. It depends upon you that you want basic features, moderate or advance features.
According to me, never go for basic features. Always look for either moderate or advance.

Minimum Features a smartphone must have are
  • Latest Version of Android or iOS.
  • 2GB RAM and recommended 3GB RAM.
  • 16GB Internal Memory and recommended 32GB.
  • 1.2Ghz processor(quad core) and recommended either 1.7 or 1.9 Ghz processor(octa core).
  • Dual Front camera and Back camera(with LED flash).
  • Proximity sensor.
  • Infrared
  • GPS.
  • 2G/3G/4G/5G network support.
  • WiFi, Bluetooth and NFC(optional).
  • Memory card support.
  • Dual SIM support.
  • Clean and easy GUI(Graphical User Interface)(comes in Operating system)

Technical Specifications

Technical specifications are in-depth of features to check the limitations.
For this we already have an article read this Difference between features specifications and technical specifications .

COMPARISON

When purchasing new smartphone don't forget to compare with other brands of smartphones at either on same price or approximate price.
Compare all features and technical specifications carefully.
You note the features then compare after collection sufficient information from internet.

Quality and Durability

This is also the main factor to care about when purchasing new smartphone.
Do Check the quality of material used on its body frame(metallic is best avoid plastic body).
Must Check glass used for display and type of display (like gorilla glass with amoled display are better).
Look for the design(should look nice when holding in hand).
Check for durability of its battery by checking main factors. Like Li-ion Battery with xxxx mAh capacity(where x is any number from 0 to 9).
Go with the maximum battery capacity.

Service Support

When purchasing new smartphone do check for the service support.
Check that the smartphone of brand your are going to purchase, has "Service care center" near your location. And If not then you should not buy that brand's smartphone.
Because if anything goes wrong you have to suffer for it.

Brand

Because, there is a high competition between smartphone maker brands. Therefore Everyone trying to provide best.
Hence now a days Brand name is not a big factor now for purchasing new smartphone.

So this is all about things you should check when purchasing new smartphone.
I hope you like the article and keep visiting "Postdynamic - The Master's World".
Don't forget to share this article with your friends and on social platforms.

Here is the simple step by step tutorial for how to Use Laptop as WiFi HotSpot.
Welcome to “Postdynamic-The Master’s World”. In this article we are going to learn that how we can use our Laptop as WiFi HotSpot to use internet on more devices and to make it virtual router. We can also use this WiFi HotSpot for many other purposes as per our requirements.

There are many applications or software available on the internet to make/use laptop as WiFi HotSpot device. But I recommend you the software named “Connectify Hotspot” that I think is one of the best software for this purpose.

And in this article we are going to make laptop a WiFi HotSpot with the help of “Connectify Hotspot” software.
This software is available in Pro version and Free version. So it is up to you that you want to use fully featured Pro version or you want to use Free version with less features.
And let me tell you, Free version is also helpful for this purpose but there will be some less features like you will not be able to change the name of the HotSpot will remain like "Connectify-me" and some other limitations will be there in Free version.

So let’s start
#LetsGoInDetail

How to Use Laptop as WiFi Hotspot?

So first of all lets talk about the requirements that what are things you need to have to proceed with this article or to accomplish this target of using/making your laptop a WiFi HotSpot.

Requirements

Hardware requirements
  1. A Laptop.
  2. Or a Desktop (PC) with USB WiFi dongle.
Software requirements
  1. Laptop with working WiFi drivers. And if you are using Desktop then USB WiFi dongle drivers are necessary.

  2. The software “Connectify Hotspot”. That you can download by searching on google by simply typing “Connectify hotspot” or from its official website(https://www.connectify.me/hotspot/).

Procedure to Make/Turn Laptop into HotSpot

  1. When you complete the above steps, now you need to Install the downloaded "Connectify Hotspot" software.

  2. After Installation you will see a new icon on your Desktop which is Connectify Hotspot.

  3. Double Click on Connectify HotSpot Icon and it will open open the software window.

  4. In this window, you will see various options like HotSpot Name, Password, Internet to share and etc.

  5. If you are using Free version you can not change HotSpot Name, but you can set the password manually that you want to set.

  6. Then select the Internet you want to share over WiFi HotSpot like your Laptop is connected with LAN wire, USB dongle or with WiFi router. You have to Select that working Internet Connection.

  7. After Doing all the settings just click on "Start Services" which is located at the bottom in software window.

  8. It will take some time to start and once it's get started you can easily connected you other devices like smartphone and other laptops or any WiFi supported device to use internet.
So this is quite easy and handy tutorial

People also reading this:- How to Ring and Find your android smartphone on silent mode

Benefits:-
  1. Free for those who cannot afford to have a WiFi router with there broadband connection.
  2. Free for those too who want to extend there router's wireless range without any extra hardware devices like WiFi range extenders.
So this is all about how to use Laptop as WiFi HotSpot. I hope you have learnt something new today. And let us know how you find this article helpful by commenting your feedback. Thanks for visiting “Postdynamic – The Master’s World” and keep visiting keep learning.

Are you looking for the answer of a Question "How to Ring and Find Your Smartphone on Silent Mode"?
Here is the Solution for you.

Welcome to "Postdynamic - The Master's World", This is very Interesting topic with the help of this article you can easily Ring and find your smartphone on Silent mode. And you can also Lock your smartphone & erase its data. So let's proceed with article.

So #LetsGoInDetail

How to Ring and Find your smartphone on Silent Mode?

First of all if you want to learn this topic in Hindi with more clarity, we have made a video on it just click on YouTube Link(https://youtu.be/c-c_pWWDnH8) and proceed with it to watch video on Our YouTube Channel "Postdynamic - The Master's World" and learn about How to Ring and Find Your Smartphone on Silent Mode.

But I'm sure you will have no doubt after reading this article. You can learn here only by reading this article completely.

So Lets Start with Requirements

Hardware Requirements
  1. You need a Smartphone that you want to ring on silent mode.

  2. You need a Laptop or Desktop. So that you can access your smartphone.

  3. And the most important is Internet Connectivity. Because the whole procedure is based on Android Device Manager app and website which requires internet to work.

Software Requirements
  1. In this section you need an application for your Smartphone i.e. Android Device Manager. Which is an inbuilt app in android Smartphones you can find it in Phone’s Settings> Security or Privacy Section. If you are unable to find it there you can install it from Play Store by simply searching Android Device Manager.


Now Lets talk about how the whole Procedure works

Okay, as you fulfilled all above the requirements lets start,
  1. Enable Android Device Manager from Phone’s Settings> Security or Privacy Section. If you have installed Android Device Manager from Play Store then open app from its icon.

  2. Remember you should enable/login Android Device Manager app with your real Gmail ID/Google account that is accessible by you only.

  3. Now go to your Laptop or Desktop and open any internet browser

  4. In URL box open/type this link https://www.google.com/android/devicemanager
    And hit enter.

  5. A google login page will open there, now Login with your Gmail ID/Google Account
    (Note: this should be the same id that is logged in your Smartphone's Android Device Manager).

  6. When you will successfully sign in to your account you will see the screen with showing your device (i.e. your Smartphone).
    And with your Smartphone there you will see three options that are: Ring, Lock & Erase. Now let me tell you how these options will work when you will click on them.

Firstly let’s talk about “Ring”
When you click on "Ring" it will ring your Smartphone on full sound volume for continuous 5 Minutes even if your Smartphone is on Silent Mode.
And when you got your Smartphone by following this procedure and it’s still ringing then press Power button or tap/open notification bar to stop the ringtone of your phone.
Second is “Lock”
This feature is helpful when you cannot find your phone or when you cannot hear the ring of your phone(means it is not in your reach or far away from you). So, when you are unable to reach your phone you can lock it by using this feature. So that nobody can use it or open it. That is why, it is very useful feature in case you lost your phone away from your home or office.
Third is “Erase”
You can also use the feature Erase if you are sure or think it has been stolen and phone contains some kind secret information or private data that you do not want to be accessed by any other person. In this case, you can erase all your data from your Smartphone.

So that’s all with this topic “How to Ring and Find Your Smartphone on Silent Mode”. Hope it will help you to find your Smartphone. And let us know how you find this article helpful by commenting your feedback. Thanks for visiting “Postdynamic – The Master’s World” and keep visiting keep learning.

First of all Welcome to "Postdynamic - The Master's World" and this post is about how to use your android smartphone as mic/microphone which is quite easy, useful and very interesting. We have also made a video about this topic on our YouTube Channel which is in Hindi(Video Link:- https://youtu.be/lRb4pC-XfB8) and you can watch that video for more clarity on how to use your android smartphone as mic/microphone. But if you are reading this article, then I'm sure you will have the Full clarity and no doubts.


So #LetsGoInDetail.

How to use your android smartphone as mic/Microphone step-by-step easy way full tutorial

First of all Let's talk about the requirements.

Hardware Requirements:-
  1. A Smartphone with WiFi, USB and Bluetooth support.
  2. Laptop or Desktop with WiFi, USB and Bluetooth connectivity.

Software Requirements:-
  1. On Smartphone Download "WO-Mic" app from Play Store or from any other source.
  2. For Laptop or Desktop download "WO Mic Client" and "WO Mic Driver" from here(WO Mic's Official Website)
  3. In Laptop or Desktop, you need a recording software. You can use any software you have or if you don't have any software then we recommend you to download and use "Audacity" which is one of the best and free recording software available.

Connectivity:-
  1. Wireless or Wired
  2. If you want to use wireless so use WiFi or Bluetooth.
  3. If you want to use wired so you can use USB cable.

So Let's Start Tutorial how to use your android smartphone as mic/microphone

Installation of WO-Mic:-
  1. First of all Install "WO Mic" app on smartphone from Play Store or respective app store available in your smartphone.
  2. Also Install "WO Mic Client" Software and "WO Mic Driver" on Laptop/Desktop by downloading from here(WO Mic's Official Website)

How to use your android smartphone as mic/microphone withWiFi

  1. First of all Connect Laptop and Smartphone with same WiFi like with WiFi router.
  2. And If you don't have WiFi router or any other WiFi available, so don't worry you can use your Laptop as WiFi HotSpot(use your Laptop as WiFi HotSpot).
  3. After connecting with WiFi, open WO-Mic app on your smartphone.
  4. In the app go to Settings>Transport>Select WiFi and come back.
  5. Now Tap/Click/Select on Start in WO-Mic app.
  6. And Now it will show you "Started. Please connect by WiFi(xxx.xxx.xxx.xxx)", where xxx = any number displayed on your smartphone which is actually your IP address on WiFi.
  7. Now finally open "WO Mic Client" software on your Laptop/Desktop.
  8. In "WO Mic Client" Select/Click Connection>Connect>Select WiFi.
  9. And in WiFi box enter that IP or xxx.xxx.xxx.xxx numbers displaying on your smartphone and Click Ok.
  10. Finally now you will see at bottom of "WO Mic Client" it will show you connected and on your smartphone it will show you connected too.
  11. Now in "WO Mic Client" do Click/Select the Options>Play In Speakers, so it will help you to directly play audio on speakers connected with your Laptop/Desktop.
  12. So If you want to record the whole audio, open "Audacity" for recording.
  13. In "Audacity" at Mic you need to select "Microphone(WO Mic Device)" and click Red dot(recording button) to start recording.
  14. After you done with your work click stop recording in "Audacity" and disconnect your devices.
  15. How to save recorded audio in audacity see this article.

HOW TO USE YOUR ANDROID SMARTPHONE AS MIC/MICROPHONE WITH
USB

  1. Connect Laptop and Smartphone with USB cable.
  2. And for this you need to enable USB debugging on your smartphone(To see How to enable USB debugging see this article).
  3. After connecting with USB, open WO-Mic app on your smartphone.
  4. And in the app go to Settings>Transport>Select USB and come back.
  5. Now Tap/Click/Select on Start in WO-Mic app.
  6. And it will show you "Started. Please connect by USB".
  7. Now open "WO Mic Client" software on your Laptop/Desktop.
  8. In "WO Mic Client" Select/Click Connection>Connect>Select USB.
  9. After Selecting USB, now Click Ok.
  10. Now you will see at bottom of "WO Mic Client" it will show you connected and on your smartphone it will show you connected too.
  11. Now in "WO Mic Client" do Click/Select the Options>Play In Speakers, it will help you to directly play audio on speakers connected with your Laptop/Desktop.
  12. So if you want to record the whole audio, open "Audacity" for recording.
  13. In "Audacity" at Mic you need to select "Microphone(WO Mic Device)" and click Red dot(recording button) to start recording.
  14. Finally when you done with your work click stop recording in "Audacity" and disconnect your devices.
  15. How to save recorded audio in audacity see this article.

HOW TO USE YOUR ANDROID SMARTPHONE AS MIC/MICROPHONE WITH
BlueTooth

  1. Connect Laptop and Smartphone with Bluetooth.
  2. So for this you need to pair your Smartphone and Laptop with Bluetooth.
  3. So after pairing with Bluetooth, open WO-Mic app on your smartphone.
  4. In the app go to Settings>Transport>Select Bluetooth and come back.
  5. And now Tap/Click/Select on Start in WO-Mic app.
  6. Now it will show you "Started. Please connect by Bluetooth".
  7. So now open "WO Mic Client" software on your Laptop/Desktop.
  8. And in "WO Mic Client" Select/Click Connection>Connect>Select Bluetooth.
  9. In Bluetooth box options select your smartphone and Click Ok.
  10. Finally you will see at bottom of "WO Mic Client" it will show you connected and on your smartphone it will show you connected too.
  11. Now in "WO Mic Client" do Click/Select the Options>Play In Speakers, so it will help you to directly play audio on speakers connected with your Laptop/Desktop.
  12. And if you want to record the whole audio, open "Audacity" for recording.
  13. In "Audacity" at Mic you need to select "Microphone(WO Mic Device)" and click Red dot(recording button) to start recording.
  14. After you done with your work click stop recording in "Audacity" and disconnect your devices.
  15. How to save recorded audio in audacity see this article.

That's it, I'm sure you are now almost ready for practical that how to use your android smartphone as mic/microphone. Thanks for visiting "Postdynamic - The Master's World" and keep visiting keep learning.
Get maximum discount at Amazon + 200rs gift card(Unlimited)
Trick to get maximum discount at Amazon + 200rs gift card(Unlimited)
This is the way people gets maximum discount at Amazon + 200rs gift card(Unlimited)


Steps for the Trick

Installation of Windows 7

How to Install Windows 7

Introduction to Windows 7

-As we all know Windows 7 is easiest and full featured Windows Ever

Installation of Windows XP

How to Install Windows XP

Introduction to Windows XP

-As we all know Windows XP is easiest and lightest full featured Windows Ever